

Importing from other tools
Move existing work into orboto from Jira, Linear, GitHub, GitLab, Asana, Trello, Notion, ClickUp, Monday.com, Redmine, Azure DevOps or CSV - the full wizard, step by step.
Admin -> Import brings an existing project into orboto through one unified wizard: pick a source, configure it, choose a target project, review and fix the mapping, then apply. It's the same wizard regardless of which source you pick - only the configuration fields on step 2 change.
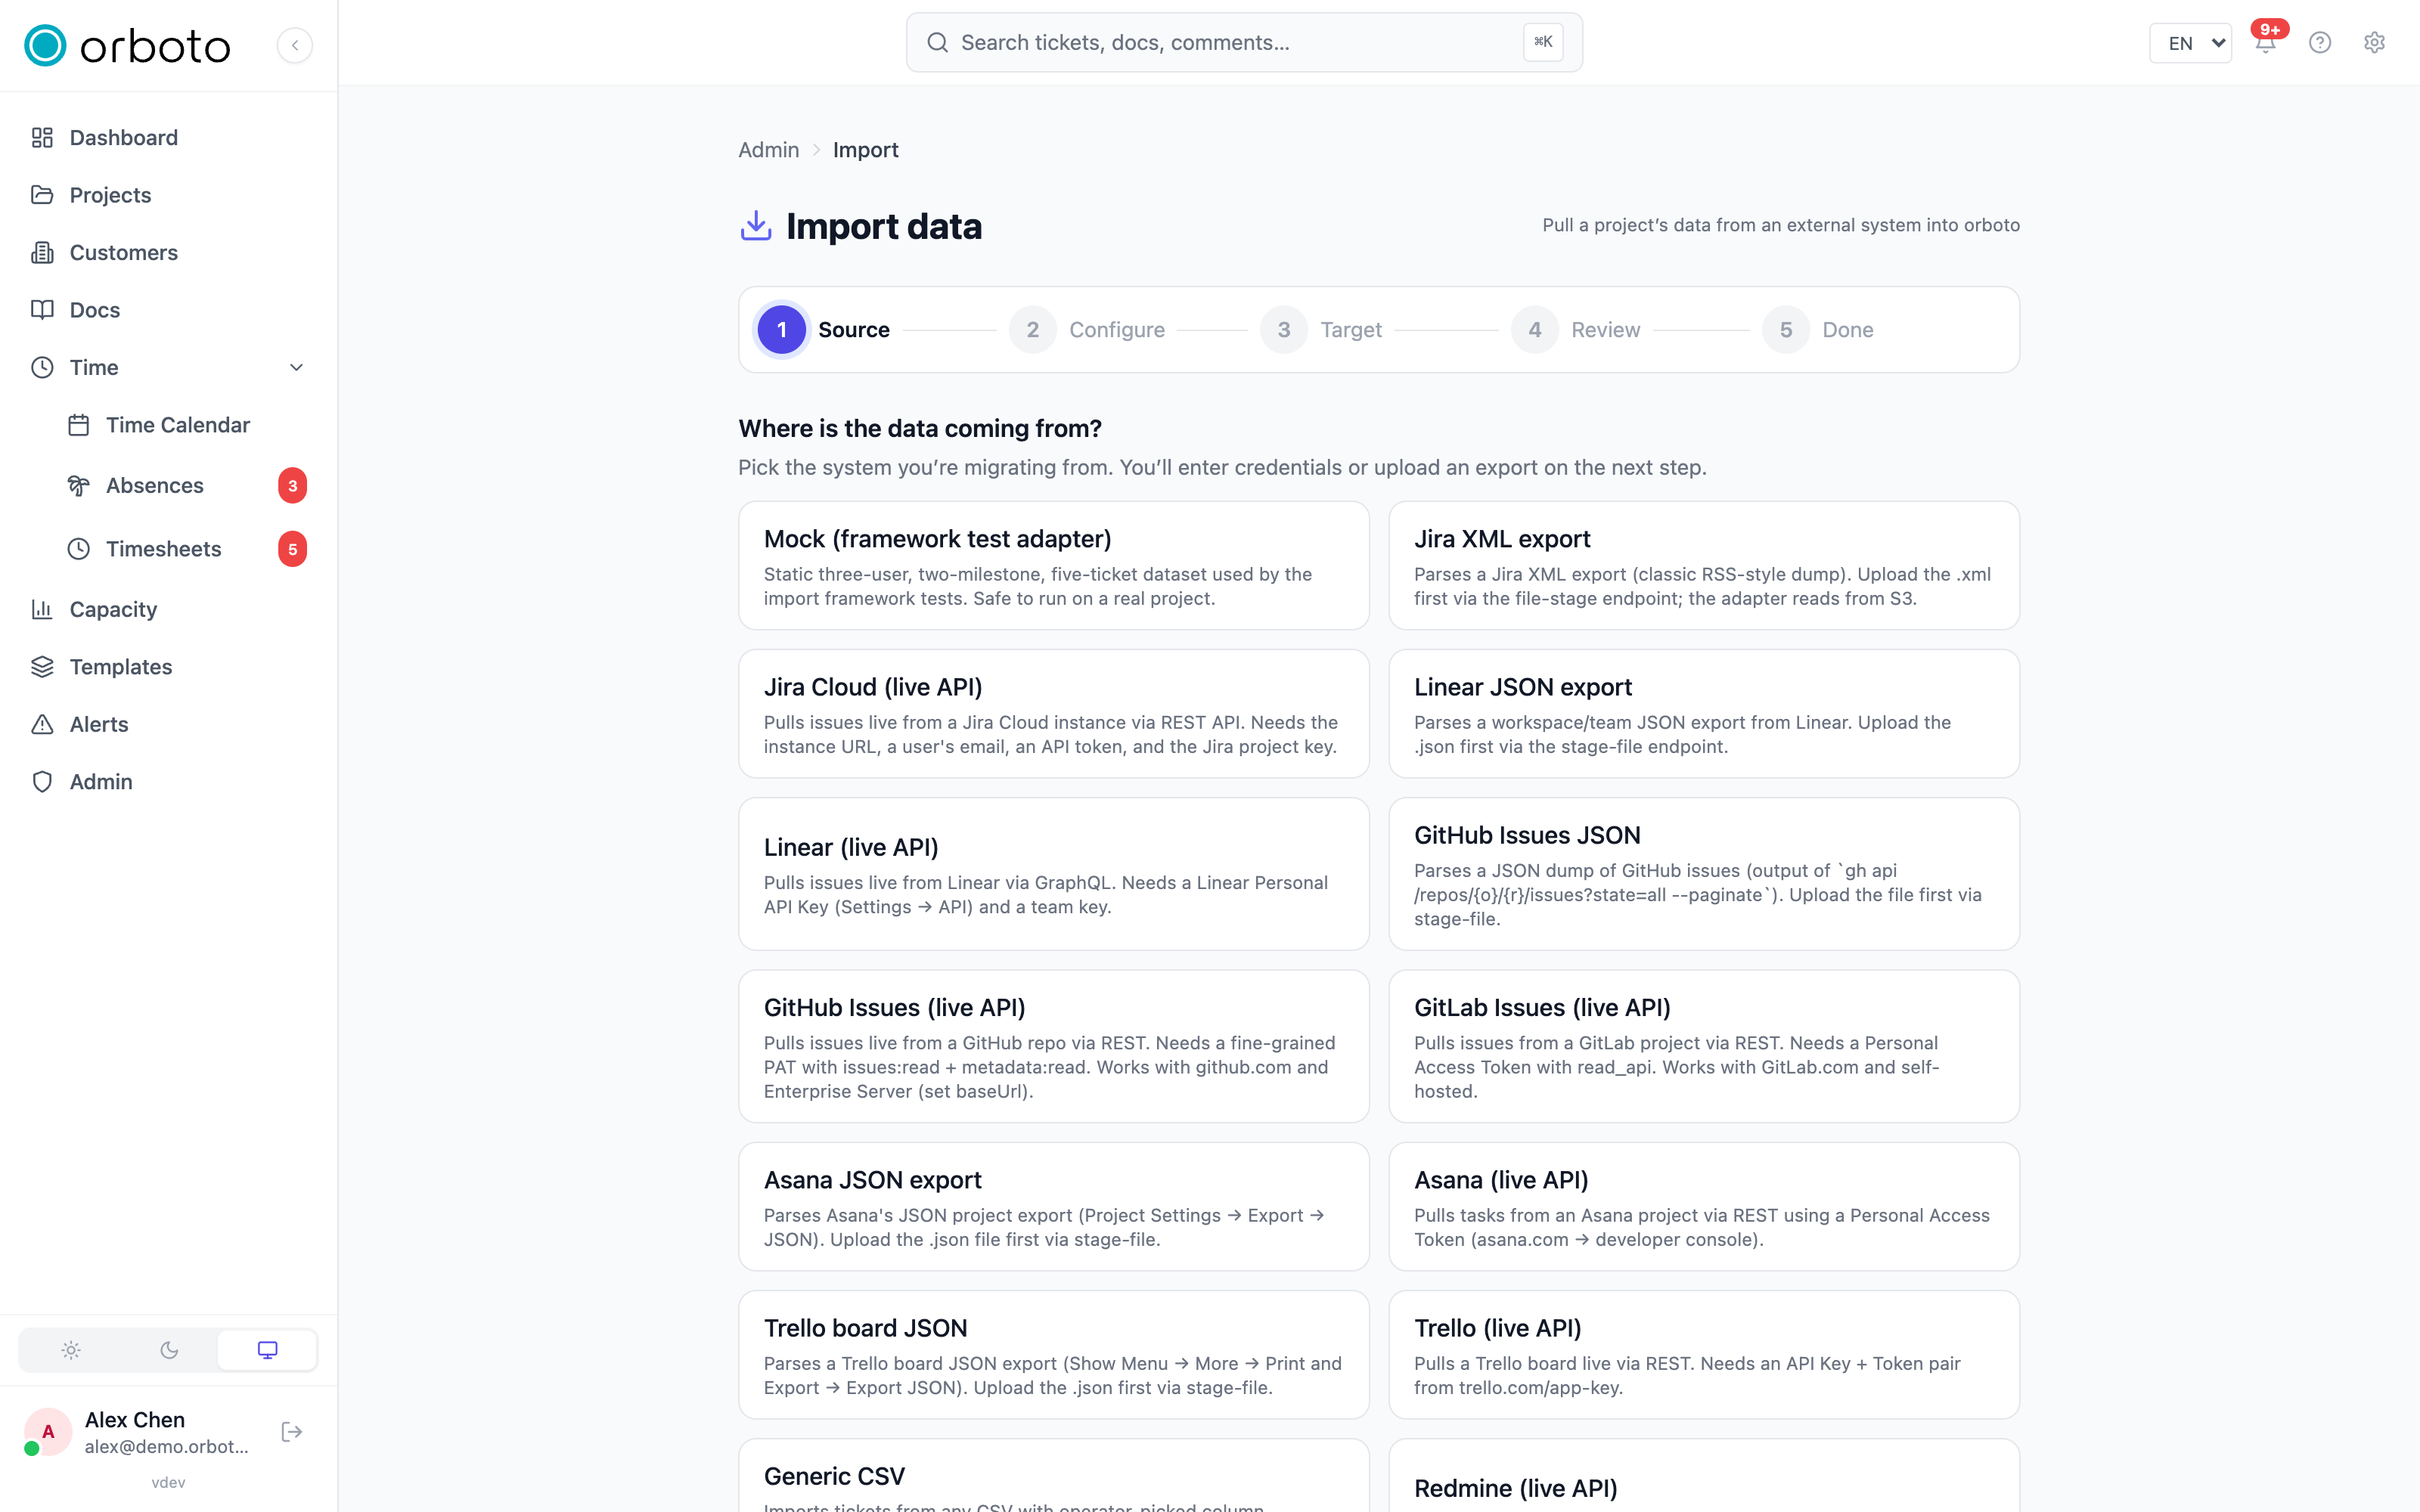
Supported sources and how to reach them
| Source | Ways in | What you'll need |
|---|---|---|
| Jira | Cloud, live API | Your Jira base URL, the account email, an API token, and the project key (case doesn't matter - orboto uppercases it automatically) |
| Jira | An XML export file | The exported XML file from Jira |
| Notion | Live API | A Notion internal-integration token; share the source database with the integration first |
| ClickUp | Live API | A ClickUp API token and the list to import |
| Monday.com | Live API | A Monday API token (Admin → API, or your personal token) and the board |
| Linear | Live API | A Linear API key and the team key (e.g. ENG) |
| Linear | A JSON export file | The exported JSON file |
| GitHub Issues | Live API | A token, the repository owner, and the repository name |
| GitHub Issues | A JSON export file | The exported JSON file |
| GitLab Issues | Live API | A personal access token and the project path |
| Asana | Live API | An Asana API token |
| Asana | A JSON export file | The exported JSON file |
| Trello | Live API | A Trello API key + token |
| Trello | A board JSON export file | The exported board JSON |
| Azure DevOps / TFS | Live API | The org/collection base URL (cloud or on-prem), the project name, and a Personal Access Token with Work Items: Read |
| Redmine | Live API | Your Redmine base URL and an API key |
| CSV | Any spreadsheet export | A .csv file - column headers can be anything, you bind them manually in step 4 |
Where both a live-API and an export-file path exist for the same source, the live-API path pulls richer data (attachments, full comment threads, live user directory for better matching) than a static export - prefer it whenever you can mint the credentials. The export path exists for when you can't get API access (a decommissioned instance, a source system your new employer won't grant you a fresh token for) or the source no longer exists at all and only a downloaded archive survives.
The five-step wizard
Step 1 - pick the source
A grid of cards, one per adapter. Click one to move to configuration.
Step 2 - configure
The form here is generated from the chosen adapter's own field definitions, so it only ever asks for what that specific source needs (see the table above). A few things apply across every adapter:
- Secret-looking fields (API tokens, passwords) render as password inputs so the value isn't visible on screen by default.
- Whatever you type is cached on this device only - non-secret fields in local storage, tokens in session storage (cleared when you close the tab) - so re-importing from the same source later pre-fills the form. Clear saved config wipes this cache if you're on a shared machine or switching accounts.
- A file-upload adapter (an export-based one, or CSV) shows a file picker instead of text fields; the file uploads and stages itself before you can continue, with a progress indicator and, once done, the filename and size shown back to you.
- A link to that provider's own documentation for generating the credential you need sits right above the form, so you don't have to leave and hunt for it separately.
You can't continue until every required field is filled; optional fields are marked as such.
Step 3 - pick the target
Two choices, as radio options:
- Create a new project - orboto names it after the source by default; you can rename it afterward. Optionally set the project key yourself here (2-10 uppercase letters/digits) - leave it empty and orboto derives one from the source name.
- Merge into an existing project - pick from a searchable list of your existing projects. Imported tickets keep their original source IDs even when merging, and labels/milestones are matched to the target project's existing ones by name (see step 4's mapping tables for how to control this).
Click Preview import to move on - this is where orboto actually talks to the source (or parses the uploaded file) for the first time.
Step 4 - preview and fix the mapping
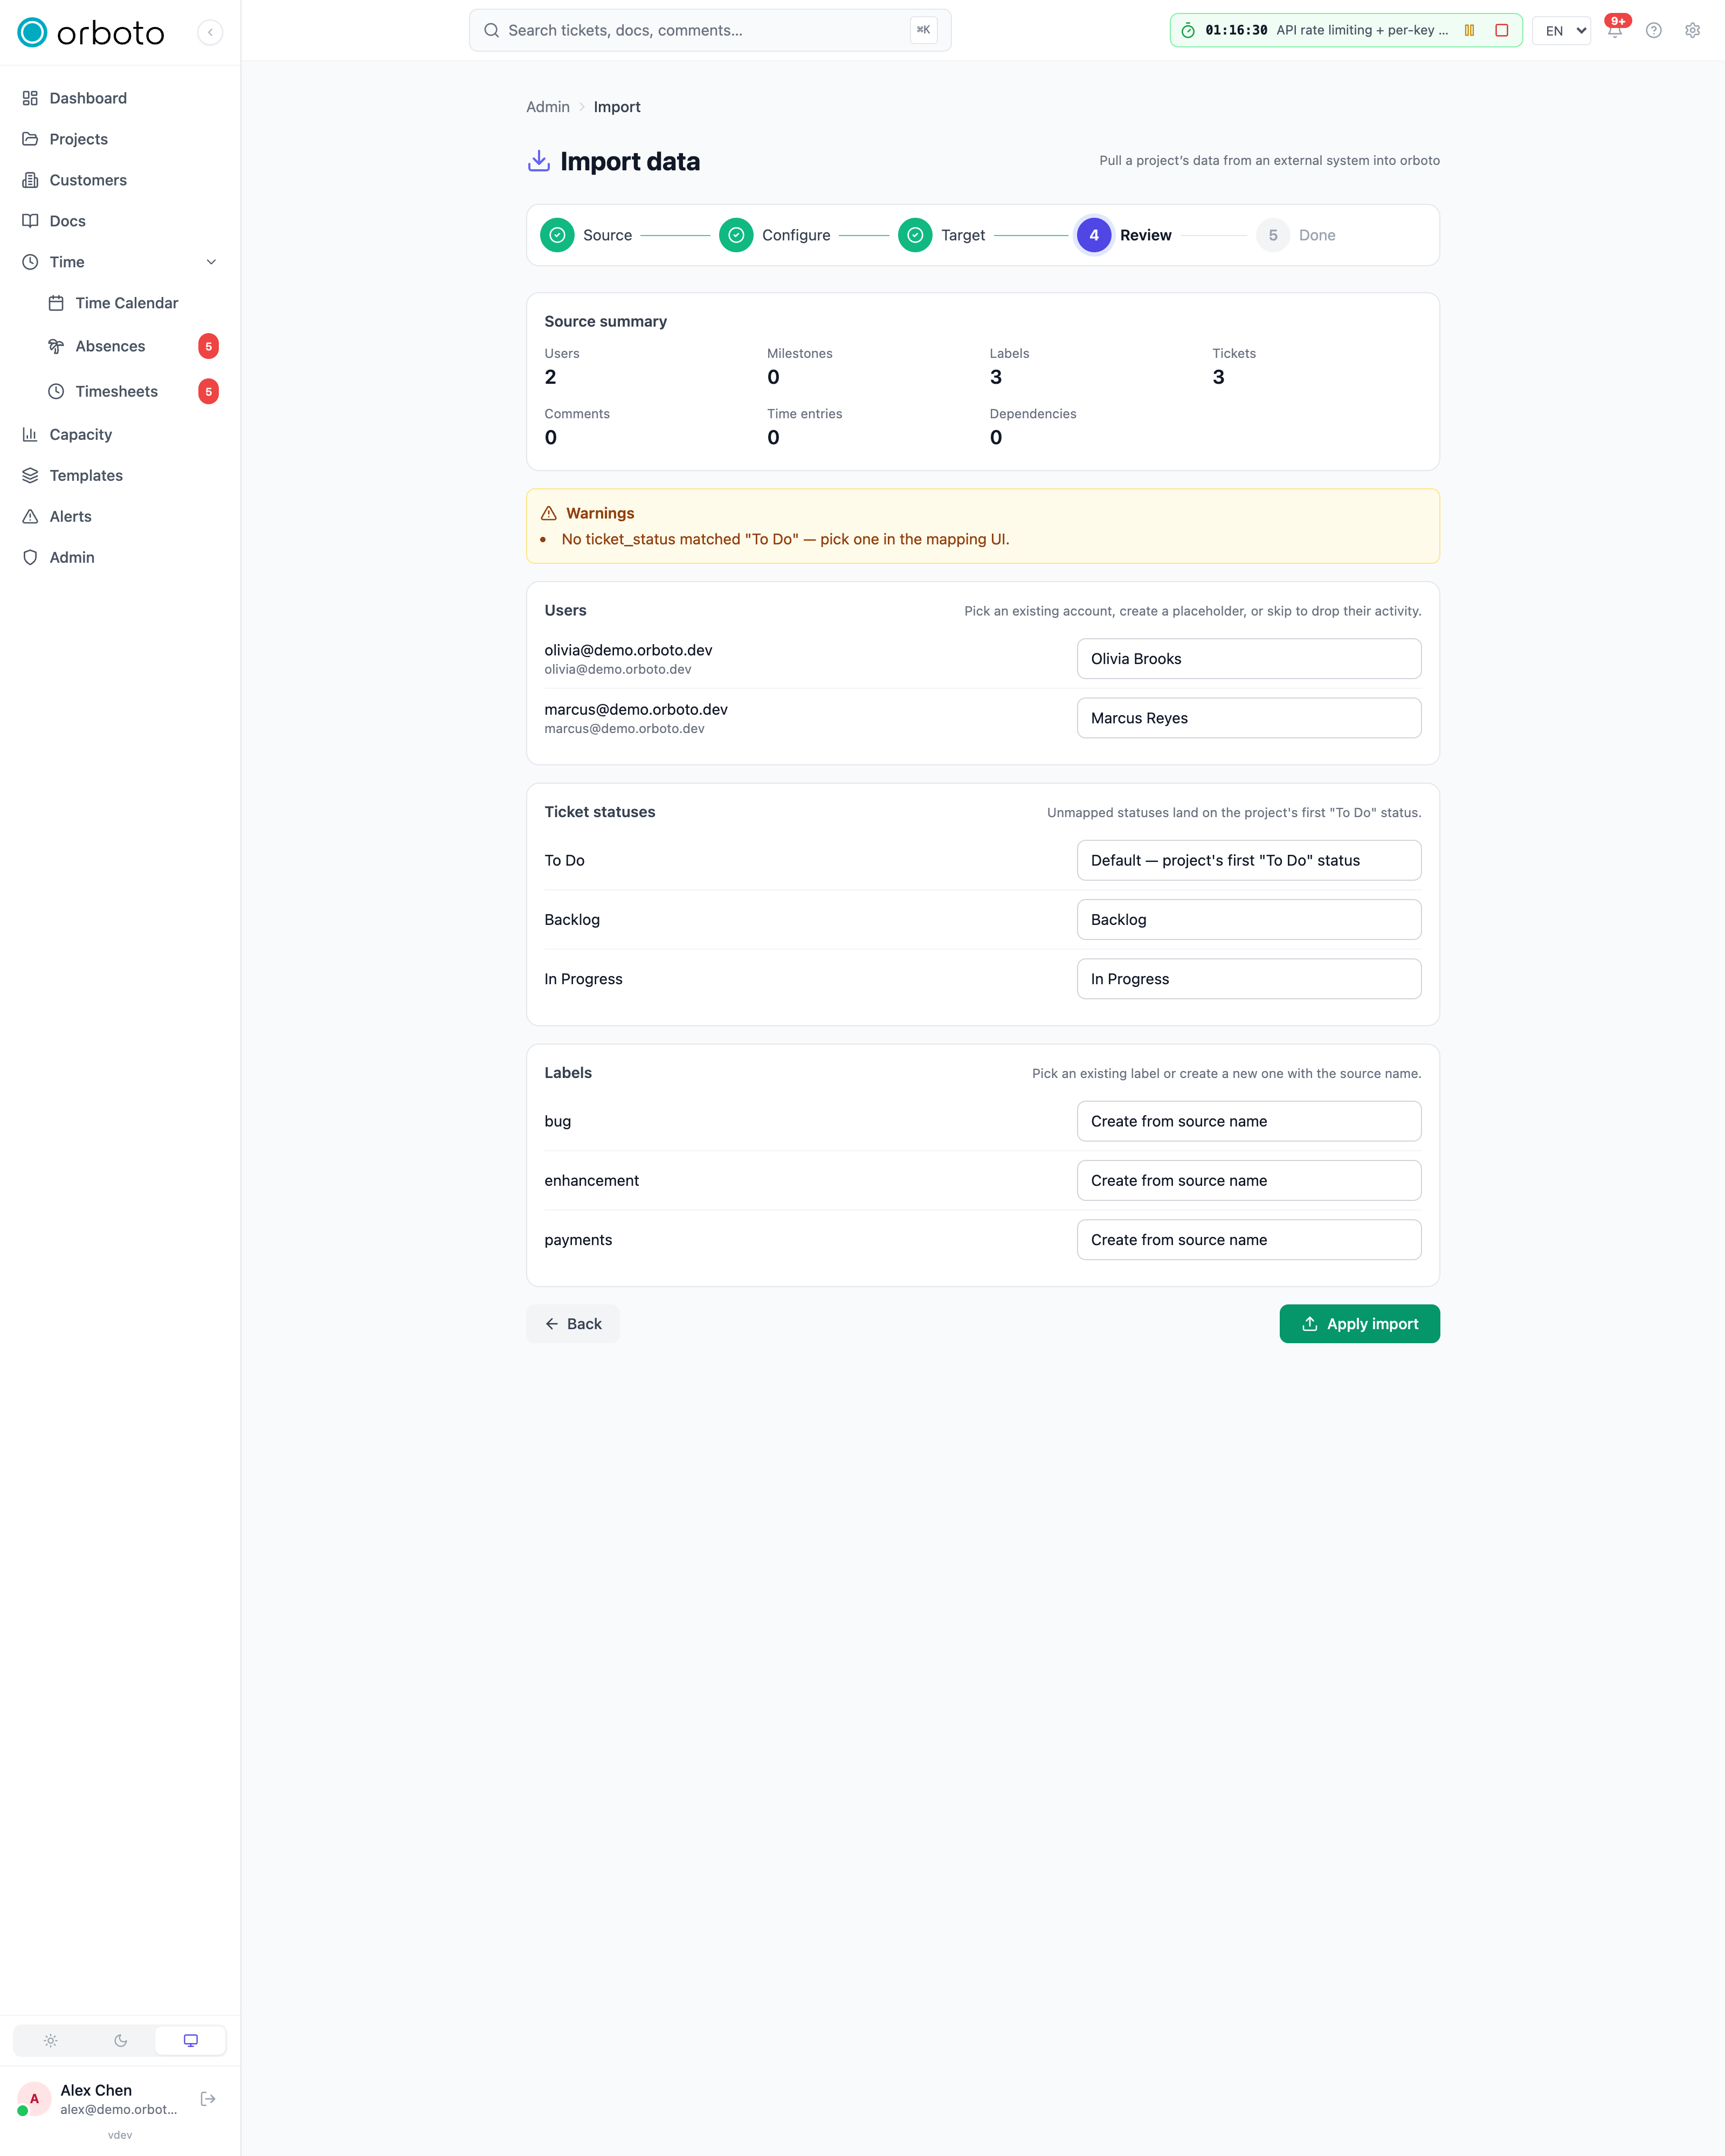
You land here with a source summary (counts: users, milestones, labels, tickets, comments, time entries, dependencies) and any warnings orboto already noticed (e.g. a field it couldn't map automatically). Below that, a mapping table per entity type - only the tables relevant to what the source actually contains appear:
- Users - one row per distinct source user. For each, pick from a dropdown: an existing orboto account (matched by email where possible, including previously-deactivated accounts from an earlier import so a re-import can land on the same person instead of forking a duplicate), Create placeholder user (no sign-in ability, but every ticket and comment they authored keeps correct attribution), or Skip this user (drops anything they were assigned, and their comments get re-attributed to you, the person running the import).
- Ticket statuses - one row per distinct status value found in the source. Map each to one of the target project's real statuses, or leave it on the default ("project's first To Do status") if you don't care about preserving the exact workflow state on import.
- Labels - one row per distinct label. Create from source name (default) or match it to an existing label in the target project.
- Milestones - same pattern as labels: create from source name, or match to an existing milestone.
CSV only gets an extra screen before this one: column binding. orboto shows every column header it found in your file and asks you to pick which column feeds which orboto field (title, description, status, priority, type, assignee email, labels, milestone, due date, source key). Title is the only required binding; leave the rest unbound to skip that field entirely for every row.
Fix whatever the mapping table doesn't already get right, then click Apply import.
Step 5 - apply and review the result
Small imports apply immediately. Larger ones run as a background job instead, with a live progress bar (tickets applied / total) so the browser tab never has to stay open and blocked on a long-running request. When it finishes you get:
- A created count broken down by entity type.
- Any warnings collected along the way.
- For a background-job import specifically, a reconciliation line: how many of the staged rows actually landed vs. how many are unaccounted for. If any are missing, the specific source rows and the reason each one failed are listed so you can fix the underlying problem (a bad attachment reference, a field that didn't validate) and decide whether to re-run just that portion.
- A direct Open project link into the freshly imported (or topped-up) project.
Imports are transactional per project - if the apply step fails partway through, it does not leave a half-imported project behind; you get a clean failure to fix and retry, not a mess to clean up by hand.
Notes
- Imported tickets keep their original source identifier in the description or metadata, so an old link (a Jira issue key, a GitHub issue number someone bookmarked) stays traceable back to where it came from.
- AI features (semantic search, duplicate detection) index imported content automatically once the import completes - there's no separate "reindex after import" step to remember.
- Re-running an import creates new items every time - it does not detect or skip anything it already imported in a previous run. Deduplicate at the source before re-importing the same data twice, or merge deliberately into the same target project and accept the duplicates if that's actually what you want.
- Imports write content in the workspace's expected language (Admin -> System settings -> Workspace language). Content that arrives in a different language still imports successfully, but degrades search and AI features for that content - watch for a repeated language-mismatch warning across a batch as a sign the batch itself may be the wrong language for this workspace, not a bug in the import.
Troubleshooting
- The configure step rejects your credentials before you even get to preview - double-check the base URL for any self-hosted source (Jira Server/Data Center, GitLab self-managed, Redmine, Azure DevOps Server all need their OWN instance URL, never the vendor's cloud default), and confirm the token actually has read access to the specific project/team you named, not just to your account in general.
- CSV preview shows zero tickets - the column-binding step hasn't run yet, or the Title column specifically wasn't bound to anything. Go back one step and bind it - it's the only required column.
- A user keeps showing "create placeholder" even though they clearly already have an orboto account - the source's email for them doesn't exactly match the existing account's email (a common cause: they changed email addresses since the source system was set up). Pick them manually from the mapping dropdown instead of relying on the automatic email match.
- Unmapped statuses all collapsed onto "To Do" - that's the documented fallback for anything left unmapped in the Statuses table; go back and map them explicitly before applying if preserving the exact workflow state matters, since it's far easier to fix here than to bulk-move tickets after the fact.
- The result screen shows tickets "unaccounted for" - only happens on the background-job path; it means the reconciliation pass found staged rows that neither landed as tickets nor were recorded as failures. Read the listed reasons for the specific rows, fix the underlying issue, and re-run just that source data if it's worth the effort - otherwise treat it as a small number of rows to recreate by hand.